Showing posts with label How 2 Do. Show all posts

Wednesday, March 11, 2015

How to Change Facebook Page Name After 300++ Likes ( 2015 updated trick)

Hello Friends, Today I am going to share one of the important posts for Facebook page owners “How To Change Facebook Page Name after 200 likes 2015″. The post is about how to change Facebook page name after 200+ likes.
Finally we have 100% working and tested “how to change facebook page name after 200 likes trick ” that will help you to change name on Facebook page after 200+ likes.
As we all know there is a limitation in Facebook, when we reached 200+ like on Facebook page, we cannot change the name of the page. Now we have the best facebook trick to bypass this limitation to change Facebook page name after 200 likes. I have personally tested this trick on my Facebook page and I am able to change the name of my Facebook page which is already having 1000+ like.

HOW TO CHANGE FACEBOOK PAGE NAME AFTER 200 LIKES:

Facebook page name change feature is already available to every user in USA. So we can simply avail these features by changing our location to USA. Don’t be afraid, we can easily change our location by a proxy chrome extension called HOLA PROXY.
Read this below steps carefully and apply in your Facebook page to Change Facebook Page Name After 200 Likes 2015:
1. Start Google Chrome browser and Click on this link to install HOLA PROXY

2. After installing HOLA PROXY extension in Chrome, now open Facebook.com in same browser.
3. Now click or press the HOLA EXTENSION ICON situated on top right side of the browser.
4. Select the country as USA (United States of America) Show in image below:
Change Facebook Page Name After 200 Likes 2015
5. Now your location is being changed to USA
change-name-on-facebook-page-using-hola-proxy
6. Once your location is changed to USA server, your facebook page will be refreshed. Now you are required to enter your Facebook credentials.
7. After login, navigate to your desired page (having more than 200 likes) which you want to change the name
8. Click on update info -> click on edit name
9. You can see a new option there “Request Change” which previously was not available.
how-to-change-name-on-facebook-page
10. Do right click on it and open it in different tab (Open in a New Window)
how to Change Facebook Page Name After 200 Likes 2015
11. A form will appear “I need to change the name of my page”. Tick on “I understand the formatting guidelines for may Page’s new name”
change-name-on-facebook-page
12. Now fill your desired Facebook page name (to Change Facebook Page Name After 200 Likes 2015).
13. You can see an option “Why you want to change your page name”. Here I am recommending you to select the option “I am re-branding my page” from the drop down menu.
Change Facebook Page Name After 200 Likes 2015
  • Now you are required to create a doc file where you have to write the reasons why you really want to change your Facebook page. Take some snapshots of your new business, website.
  • Now tick the box and click on SEND button
  • A message will be displayed in front of you saying “You will receive an email response shortly”
  • After maximum 2 or 3 days, you will see the change in your Facebook page name with your desired name.

You are done with how to change facebook page name after 200 likes 2015 trick.
Enjoy and share this with your friends, they can also be able to change their Facebook page name.
If you still have any query regarding on How to Change Facebook Page Name After 200 Likes 2015, you can comment here. We will try to solve them in 48 hours.
TAGS:
  • how to change facebook page name after 200 likes 2015
  • change facebook page name after 200 likes 2015
  • how to change facebook page name after 200 likes trick
  • how to change page name after 200 likes 2015
  • change page name after 200 likes 2015

Tuesday, March 10, 2015

What Is USB Debugging Mode On Android?

you use an Android phone and you’ve searched forums for solutions to problems, you’ve probably heard the term “USB Debugging” every once in a while. You may even have seen it while looking through your phone’s settings. It sounds like a high-tech option, but it really isn’t; it’s quite simple and useful.
One beauty of Android is that it has a lot of built-in features, many of which are advanced. If you want to supercharge your phone with mods and whatnot, you can; if you want to use it just as it was out of the box, you can ignore the advanced stuff. USB Debugging is a feature that all users can benefit from, though, so you should know what it does and when to use it.

What Is USB Debugging Mode?

USB Debugging Mode is a mode that can be enabled in Android after connecting the device directly to a computer with a USB cable. The primary function of this mode is to facilitate a connection between an Android device and a computer with Android SDK (software development kit). As the name might suggest, Android SDK is a software suite that’s designed to aid in the development of Android apps.

Ever wondered how a programmer creates apps on the Android? They definitely don’t code them straight on the phone device! That would be nightmarish at best. Instead, they utilize the environment of the Android SDK to code apps on a computer, use USB Debugging Mode to transfer those apps to a device for testing.

usb debugging

But, again, here’s the takeaway: USB Debugging Mode establishes a direct connection between an Android device and a computer and readies it for deeper-level actions. That’s the important part.
In some versions of Android, the USB Debugging Mode feature may be called Developer Mode. With such a name, it can be easy (and reasonable) to think that you’ll never need to deal with this aspect of Android if you never plan on developing anything. That’s not exactly true.

Why Is USB Debugging Mode Important?

USB Debugging grants you a level of access to your device. This level of access is important when you need system-level clearance, such as when coding a new app. However, there are a few non-development-related benefits from this new level of access that can give you much more freedom of control over your device.
For example, with Android SDK, you gain direct access to your phone through your computer and that allows you to do things you normally couldn’t, like snag instant screenshots of your device or run terminal commands with ADB. These terminal commands can help you restore a bricked phone–a useful tool for any adventurous Android owner. Without it, you’d have to get a replacement phone.
android usb debugging

USB Debugging is also necessary if you ever want to root your Android device. Before an app like One-Click Root can dig into your system and deliver the exploit that roots the device, USB Debugging is necessary to allow that function in the first place.
Yes, the original intention for USB Debugging Mode was only meant for developers who needed to copy data between their computers and Android devices, to install apps on the phone without notifications, and to read log data off the phone. But even if you aren’t a developer, you’ll probably run into a few apps that require USB Debugging Mode to function properly, so this mode does affect you and you should know about it.

What You Need to Know About USB Debugging Mode

By this point, you may have noticed that USB Debugging isn’t used all too frequently. You’re right. This feature of Android isn’t something that you take advantage of on a daily basis unless you’re coding an app. However, when it does come in handy, it really saves you a lot of time, effort, and even money.
usb debugging

Therefore, it’s best to keep USB Debugging Mode disabled and only enable it when you really need it. When running an app, for example, it’ll let you know if it needs you to enable the mode before it can do anything. When that happens, you can enable it, let the app do its thing, then disable it again. Few apps will require your phone to constantly be in debugging mode.
Lastly, starting with Android 4.2, access to the USB Debugging Mode option has been hidden by default. I’m not entirely sure why the development team thought that move was necessary, but fortunately it’s not too much of a pain to get it visible again.

Conclusion

Just know that USB Debugging is not a super-high-tech feature that you need to be afraid of. Think of it as yet another tool that gives you full control over your device. This kind of power does invite abuse, though, so keep it disabled at all times and only enable it when you know you need it and you’ll be fine.
If you have any questions about USB Debugging, please ask in the comments. I’ll try my best to answer them.             

How to Flash Lollipop Custom Rom On Lava Iris X5


Hello Guys today I am going to show you How you can easily Flash Lollipop Custom Rom On Lava Iris X5 without any problem.


Hello Guys today I am going to show you How you can easily Flash Lollipop Custom Rom On Lava Iris X5 without any problem.

For step by step tutorial:http://adf.ly/138clg

Lollipop Rom: download this

Short Review Video:http://adf.ly/19TRwo

If you like this video then please like share and subscribe.

Thursday, March 5, 2015

Internet Download Manager Latest Version Free Download With crack (IDM) - 2015

Internet Download Manager (IDM) is a tool to increase download speeds by up to 5 times, resume and schedule
downloads. Comprehensive error recovery and resume
capability will restart broken or interrupted downloads due
to lost connections, network problems, computer
shutdowns, or unexpected power outages. Simple graphic
user interface makes IDM user friendly and easy to
use.Internet Download Manager has a smart download
logic accelerator that features intelligent dynamic file
segmentation and safe multipart downloading technology to
accelerate your downloads. Unlike other download
managers and accelerators Internet Download Manager
segments downloaded files dynamically during download
process and reuses available connections without additional
connect and login stages to achieve best acceleration
performance.
Internet Download Manager supports proxy servers, ftp and
http protocols, firewalls, redirects, cookies, authorization,
MP3 audio and MPEG video content processing. IDM
integrates seamlessly into Microsoft Internet Explorer,
Netscape, MSN Explorer, AOL, Opera, Mozilla, Mozilla
Firefox, Mozilla Firebird, Avant Browser, MyIE2, and all
other popular browsers to automatically handle your
downloads. You can also drag and drop files, or use
Internet Download Manager from command line. Internet
Download Manager can dial your modem at the set time,
download the files you want, then hang up or even shut
down your computer when it's done.
All popular browsers and applications are supported!
Easy downloading with one click.
Automatic Antivirus checking.
Video grabber.
Drag and Drop.
IDM includes web site spider and grabber.
Download All feature.
IDM is multilingual.
Download Speed Acceleration.
Download Resume.
Quick Update Feature.

Download Click Here

How to Create a Bootable any OS (Windows7, Windows 8, Windows 10) USB Flash Drive

Download Software on your computer
and run it .
Step 2: Plug in your USB flash drive into your
computer .
Step 3: From Rufu’s settings, Choose NTFS as the
file system.
Step 4: Check ” Quick format ” and ” Create
extended label and icon files “
Step 5: Check ” Create a bootable disk using ”
and click the drive icon beside it to select the
windows 7 ISO file .
Step 6: Now click on start to create a bootable
window 7 USB flash drive
After a few minutes your Windows 7 bootable
USB flash drive will be ready for installation.
Reboot your PC and set the bootable flash drive
as a first boot priority in the bios settings. Save
the bios settings and reboot once again to
continue with the windows 7 installation
process .

Link

Monday, February 16, 2015

How to verify mobile number at microworker.com In Nepal India

I got this message from microworkers.com


Microworkers is using Twilio.com as the SMS provider to send out all SMS PINs. If you have difficulty receiving SMS PIN, please check to make sure your SMS carrier is on Twilio provider list here:
You can input your country and Twilio will list all the SMS carriers that it support currently. If you don't see your SMS carrier on Twilio list, you can suggest Twilio to add your carrier to the list so that you can receive SMS PIN from Microworkers. Please do not request SMS PIN from Microworkers if your SMS carrier is not on Twilio provider list.
Thank you for your patience,
Microworkers
Twilio SMS offers pay-as-you-go pricing for SMS and text messaging, scaling with your business needs. International SMS and volume pricing also available.
TWILIO.COM


 Microworkers.com has introduced the addition of mobile number into account. All you have to do is add you mobile number and verify it by entering the verification PIN received on your mobile. For more details about adding mobile number to Microworker account, please refer to my old post about this.
In this post, I want to help those peoples, who are facing problem in verifying there mobile number. Actually, after adding mobile number to our account, Microworkers send a verification PIN on our mobile, which we have to enter there in order to verify our mobile number. This PIN is almost same like the PIN number we receive through post when we withdraw money from microworkers for first time.
The problem here is that, after adding mobile number, people are not getting the PIN numberon there mobile. They send the PIN free fro first 3 times. After that, they charge $0.05 for every PIN number sent. One of my friend tried around 15 times, but he yet not got the PIN. So I started finding the solution and got it.
If your mobile is registered in DND, you will not receive the PIN number anymore. All you have to do is, check whether your mobile number is registered in DND or not. If it is, you have to STOP DND by sending an SMS like below:
STOP DND to 1909 or call 1909 and manually remove your number from DND registry.
The above procedure is for India users only.
Note: After verifying your mobile number, you can again start DND. 
Further, if your number is registered to DND, for no more than 90 days, you have to either wait for 90 days to complete, or modify your mobile number (Add other mobile number). If you have another working mobile connection, then first please verify that your mobile number is not registered in DND registery.
In conclusion to my post, I can say that if your mobile number is registered in DND, you will not get the PIN. So either you have to Opt Out from the NDNC registry or modify the number with a new number which is not registered in DND. I have tried this solution with more than 3 accounts of my friends and cousins, and all were successfully verified. You can check the DND registeration status of your mobile number on various websites, one of a good one is following
http://www.dndcheck.in
If any of you still facing any problem regarding the mobile number verification, please push a comment.(Don’t forget to mention your email ID in comment). I will try to help you out, as soon as possible.
Please share this post, if you find this helpful.
Focus Keywords
  • Microworkers.com mobile number verification.
  • How to verify mobile number at Microworkers.com
  • Problem verifying mobile number at Microworkers.com
  • PIN number not receiving on mobile for microworkers.

Sunday, February 15, 2015

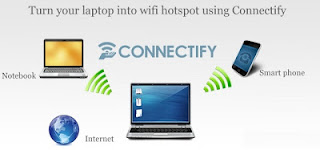
Do you know you can share your laptop internet as wifi -Learn how?

share wifi in laptop without application
तपाईंको ल्यापटपमा connect भएको ईन्टरनेट बिना कुनै software Installation गरी ल्यापटपबाट ल्यापटपकै WiFi प्रयोग गरी share कसरी गर्न सकिन्छ त ???

मानी लिनुहोस् तपाईंले आफ्नो ल्यापटपमा LAN connection जोडेर ईन्टरनेट चलाईरहनु भएको छ र तपाईं यही connection बाट WiFi प्रयोग गरी अरु ल्यापटप, Tablet अथवा मोबाईलमा पनि नेट चलाऊन चाहनु हुन्छ भने भने तपाईं के गर्नु हुन्छ ? धेरैको सोचाइ यही हुन्छ कि यो काम गर्न त wifi मोडेम नभई सम्भब छैन तर यसो हैन .. तपाईंले आफ्नो ल्यापटपकै wifi प्रयोग गरी LAN connection लाई पनि WiFi connection बनाउन सक्नु हुन्छ । एउटा तरिका त तपाईंले आफ्नो ईन्टरनेट connection ल्यापटपको ad-hoc function प्रयोग गरी WiFi सिग्नलमा परिणत गरी अरु डिभाइसहरुमा share गर्ने । यसको लागि तपाईंले आफ्नो ल्यापटपको connection option मा अरु केही setting हरु मिलाउनु पर्ने हुन्छ । 

तर यो भन्दा कुनै अरु सजिलो तरिका छ त ? अबस्य पनि छ ...


share wifi in laptop


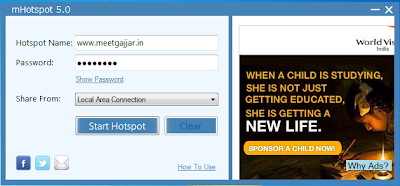
ल्यापटपको कुनै पनि setting आँफैले नचलाई एउटा simple software को प्रयोग गरी तपाईंले यो काम सजिलै गर्न सक्नु हुन्छ । फ्री मा उपलब्ध mHotSpot v5.0 नामक software को माध्यम बाट तपाईंले यो काम सजिलै गर्न सक्नु हुनेछ तर यो software Windows7 ओपेरटिङ सिस्टममा मात्र काम गर्छ । त्यसैले तपाईंको OS Windows7 नै हो भने लौ बन्यो तपाईंको काम ... आफ्नो ल्यापटपमा कुनै पनि ईन्टरनेट connection जोड्नुहोस् र त्यस्लाई Wifi सिग्नलमा परिवर्तन गरी मोबाईलहरुमा , Tablet हरुमा अथवा अरु ल्यापटपहरुमा सजिलै ईन्टरनेट चलाऊन तयार हुनुहोस् ......................

Features in mHotSpot v5.0 for Windows:

@ Create a Wifi-Hotspot in you laptop (Currently Windows 7 only)@ No Installation required@ Fully customizable Hotspot Name@ Share any type of Internet Connection(LAN, Ethernet,3G/4G,Wifi etc)@ Extends your Wifi range(Acts as a repeater)@ In-app internet selection
@ Works for Android and other smartphone with Wi-Fi to access the created wifi network.
Instructions to Use:
@ Download zip file from direct link given below and extract "mhotspot.exe".
@ Double click the mhotspot.exe file (may be you need to run as administrator).
@ Enter any name of your choice as Hotspot name.@ Choose a password of minimum 8 chars.@ Select your active internet connection from the drop-down list of connections.@ Click start Hotspot to start your own personal wifi hotspot.
Supported OSs: Windows 7 (Compatibilty for Windwos 8,Vista, XP will be come in mHotSpot v6.0)

Download Free mHotSpot v5.0 for Windows:  
( Software डाउनलोड गर्न तलको लिन्कमा क्लिक गर्नुहोला   )

Friday, February 6, 2015

Auto Invite All your friend To like your facebook


Are you having trouble to invite you friend to like your page due to the updates made my facebook ?
Dont worry you can save time by  the easy trick from me


--------------------------------------------------------------------------------------------------------------------------

The trick I am going to teach you today is really going to make you happy.I can guaranteed you that  this trick is going to work but what you have to do is to follow me .even you cant leave a single step. so let me proceed 

The following are the most important steps you need to follow


  •  Download & Install Google Chrome

  •  INSTALL THIS (( Tamparmonkey )) Download From Here ( http://adf.ly/zKAT9 ) For Safety !

  •  Now Open This Link ( http://adf.ly/zKBqV ) & Copy All Code By Pressing [ Ctrl + A & Ctrl + C ]

  •  Now Go To Your Facebook Page & Open Console By Pressing [ Right Click & Press Q ] Then Click On [ Console ] 

  •  Paste All Code By Pressing [ Ctrl + V & Press ENTER ] & Wait To Complete Inviting Your Friends To Like Your Page After Complete Refresh The Page.... Done !

  •  After Few Minutes You Will See Your Page Is Increasing Likes 
Thats all now you have do all 

Wednesday, February 4, 2015

Link your website With facebook

Are you worried for posting in Facebook although you have posted in your website or blog
Do you know  you can link  your website with your Facebook or twitter account .Then you have to just follow me .
There are lots of plugins and apps that make it very easy to republish blog content to your Facebook personal wall, but many businesses these days are much more interested in publishing new blog posts to their Fan Pages.

There are a number of applications, both free and paid, that can help you do this, but Facebook has a built in tool that I think is the best option.

One of the native Facebook apps is something called Notes. Notes has a number of interesting uses, but if you dig just a bit you’ll discover that you can add an RSS feed as a note. When you add the Notes application to your FanPage and add your blog’s RSS feed as a new note, Facebook adds a tab that is the name of your blog and automatically updates your wall stream with the latest blog posts.

I like this approach because it’s easy and because Notes is not a 3rd party application – meaning when Facebook makes a change it will still work. I also like that it automatically updates your newsfeed when your RSS feed updates.

Here’s how to get it work for you

  1. Open your fan page (this assumes you have one)
  2. Click on the + to add the Notes Tab if you don’t have it added already
  3. Click on Notes Tab and hit Add New Note
  4. You will get a form for adding notes, but instead click on the Notes Icon above the form (See Image #1 below)
  5. From this screen you will see that you can import a blog. Add the URL to your RSS feed and hit Start Importing.(See Image #2 below)
  6. The Notes app will populate this page with your last few blog posts. Not e that a number will jump to your wall page with this first import, but from then on when you publish a new post it will show up in the stream. (See image #3 below)


Wednesday, January 28, 2015

Enjoy Free Wifi -hack wep wap or wp


                                                                 source:-wirelessdomination

A COMPLETE GUIDE

This tutorial will show you how to crack WPA2 and WPA secured wireless networks. Please note that this is not the Reaver attack.
If you want to crack WPA/WPA2 using Reaver then read this post. The process is done by airmon-ng suite. Many steps are same for WEP cracking and WPA/WPA2 as well.
 NOTE: This tutorial is for Educational Purposes Only!
What You’ll Need
For this you will require all the basic things like a computer, spare time, etc. But important things are as follows:
  • BackTrack OS. Backtrack is a bootable Linux distribution with lots of pen-testing tools and is almost needed for all my tutorials. So, if you have not installed it please read this article on how to install it.
  • A compatible wireless network adapter. If you are live booting BackTrack then the internal adapter will work but I recommend an external wireless adapter.
Let’s Get Started
Step 1:Boot into BackTrack
You can use any method to boot into backtrack; like from live cd, VMware, dual boot, etc. So, just boot it first into the GUI mode and open up a new console(command line) which is in the taskbar.
Step 2: Gather Information
Before launching the attack you need to know about your wireless network interface name, make your wireless card is in monitor mode. Then get the BSSID ( it is the series of unique letters and number of a particular router) of the access point. So let us do all these things.
First lets find your wireless card. Inside terminal or console, type:
airmon-ng
Press Enter and there you should see a list of interface names of different devices. There should be a wireless device in that list you you have connected it to BackTrack. Probably it may be wlan0 or wlan1.

rack WPA2 and WPA WiFi password
hack WPA2 and WPA WiFi password
Enable monitor mode. Supposing your wireless card interface name as wlan0, type this command in that same console.
airmon-ng start wlan0
This code will create a new monitor mode interface mon0 like in the screenshot below which you want to keep note of.

rack WPA2 and WPA WiFi password
hack WPA2 and WPA WiFi password
Search the BSSID and channel of the Access Point (router) you want to crack. Now let us find the information. For this type the following and press Enter
airodump-ng mon0

rack WPA2 and WPA WiFi password
hack WPA2 and WPA WiFi password
Then you will see a list of Wireless Networks available around you and please keep note of the BSSID and channel of the ESSID (wireless network) you want to crack. Please note that the less the number is in the PWR column the close you are to the router; example mine is (-42) which means i am quite near to the router. When you find it hit CTrl+C to stop it scanning and enter the following:
airodump-ng --bssid (AP BSSID address) -c (chaneel no) -w (file name you want to save with) (monitor interface
So, in my case it will be
airodump-ng --bssid 54:E6:FC:E0:AC:FC -c 1 -w WPAcrack mon0
Then the screen will look like this:

rack WPA2 and WPA WiFi password
hack WPA2 and WPA WiFi password

rack WPA2 and WPA WiFi password
hack WPA2 and WPA WiFi password
Step 3: Let’s Get Cracking
Now, its time to capture a 4-way handshake so that we can use it to get the plain password of the network. Here is a little tricky part, if there is a client connected to the network then there will a mac address listed in the “station column” like in the screenshot below and if not then you will have to wait for someone to connect it to get 4-way handshake.You will get the handshake if anyone tries to connect to that network.
But, if there is someone is connected on the network then you can deauthenticate him so that he will try to reconnect and you will be able to get the handshake. To deauthenticate him enter the following code in new console. But, before take note of the Mac Address of the station.
aireplay-ng -a (BSSID of the network) -c (MAC address of the client) -0 20 (for deauntheticate "20" for no of packets to send) (monitor interface)
You can send any no of packets but few packets would be enough. In the image I have send 0 packets which is unlimited but it is better you send few packets and only and if you don’t get the handshake you can hit Ctrl+C to stop the process and redo it again.
aireplay-ng -a 54:E6:FC:E0:AC:FC -c 9C:4E:36:4E:F5:F0 -0 20 mon0
hack WPA2 and WPA WiFi password
Now it will send deauthentication packet and if you are close to the network and if everything goes right then he will get disconnected and will try to connect again and we will get the 4-way handshake file in the top right corner of the airodump screen as shown below. But, the client should also be physically close to your wireless adapter network range so that it can deaunthecate them.
hack WPA2 and WPA WiFi password
Step 4: Cracking The Password
Now its time to crack the 4-way handshake which is little difficult to do. There are lots of ways to do it but I will show you the simple one.
First let us see where is our saved .cap(4-way handshake) file so please enter the following :
ls
It will show you the list of files in your Desktop. The screen would look like this.

hack WPA2 and WPA WiFi password
Now, lets bruteforce the .cap file using aircrack-ng. You will need a Dictionary or word list file to get it work. There are few of them already in the BackTrack but you can download more. Aircrack simply tries to match the word from the dictionary to the .cap file and if matched then it will show the password but if the word is not in the dictionary then it will fail. We are using the darkc0de.lst password list which can be found in “/pentest/passwords/worldlists/darkc0de.lst” of BackTrack. Enter the following command
aircrack-ng -w (location of the password list) (cap file *.cap)
In my case,
aircrack-ng -w /pentest/passwords/worldlists/darkc0de.lst" WPA2crack-01.cap
hack WPA2 and WPA WiFi password
Depending upon the speed of your CPU and the size of the password file it could take a lot of time. The -01 is automatically added by the BackTrack and everything is case sensitive. After executing this command the screen will look like this.

hack WPA2 and WPA WiFi password
If the key is found then it will say, “KEY FOUND!” like in the screenshot below and if not it will say, The pass-phrase is not in the Dictionary or something like this. So, if it is not found then you can try to bruteforce it by trying every combination of word which will take lots of time. I will teach the other methods soon like brute forcing .cap by using Graphics card and so on. So, stay tuned.

hack WPA2 and WPA WiFi password
NOTE: It is not guaranteed that you will get the 4-way handshake. It depends upon various factors. But the main thing is that the physical distance between your wireless adapter, the access point and the client should be close to work for it.
Precautions:
  • Do not put the password that are in the dictionary. Use combination of alphabets, letters and symbols too
  • In your router setting you can hide your ESSID (the name of your wireless network)
  • In your router there will probably be a mac-address filtering service where you can specify the mac addresses that are allowed to connect to your router and no other will be able to connect to it but it is a little irritating if any of your guests wants to connect to your Wifi.
  • SOURCE:-WIRELESSDOMINATION

Ordered List